Garden Pathway Lighting: Simple Upgrades with Big Impact
Garden pathway lighting enhances safety, beauty, and nighttime ambiance. Simple upgrades—like solar stakes, LED path lights, or bollards—add elegance and security while extending outdoor enjoyment after dark.
Your garden is a sanctuary by day, but by night, without the right lighting, it can fade into shadows and lose both charm and safety. Garden pathway lighting is one of the easiest, most effective upgrades you can make to bring your landscape to life after dusk. With just a few thoughtful touches, you can transform your walkways into inviting, safe, and visually captivating paths that encourage evening strolls, socializing, or simply relaxing outdoors.
In this guide, we’ll walk you through the benefits of pathway lighting, practical design strategies, fixture types, simple retrofits, installation tips, and maintenance pointers. You’ll discover how small investments, solar stake lights, LED strips, bollards, or uplights—can dramatically enhance both the function and aesthetics of your garden. Whether you're doing it yourself or working with a contractor, by the end you'll be equipped to turn your garden paths into glowing, welcoming corridors that extend your enjoyment long after sunset.
Why Pathway Lighting Matters
Safety & Accident Prevention
One of the primary reasons to light your garden path is safety. In darkness, even familiar walkways can hide uneven surfaces, steps, or rocks. Well-placed lights reduce the risk of trips and falls, especially for children, seniors, or guests navigating after dark.
Curb Appeal & Home Value
A softly illuminated walkway adds elegance and visual interest, increasing your home’s perceived value. Thoughtful lighting highlights architectural features, plants, and textures, turning your landscaping into a showcase.
Extending Outdoor Use After Dark
With pathway lighting, your garden becomes a comfortable space even after sunset. You can host evening gatherings, stroll under the stars, or simply enjoy the ambiance without stumbling in the dark.
Security & Deterring Crime
Darkness invites uncertainty. Illuminated paths reduce hiding spots for intruders and make your property feel more monitored. Lighting communicates an occupied, well-cared-for space.
Principles of Good Path Lighting Design
Balancing Ambience and Function
Your lighting should guide without shouting. Bright enough to see steps clearly, but soft enough to preserve the garden’s mood. Design experts warn against overly stark, “runway” style lighting.
Avoiding the “Runway” Effect
If lights are spaced too close or too uniformly, the path can look like an airport runway. A better rule is to space fixtures around 8–10 feet apart (≈2.5–3 m), adjusting based on brightness and path width.
Layered Lighting Strategy
Think in layers: ambient (general light), task (for the path itself), and accent (to highlight plants or architecture). Use path lights for task lighting plus uplights or downlights for drama.
Color Temperature & Light Intensity
Warm white (2700–3000 K) is ideal for garden lighting—it feels cozy and flatters natural materials. Avoid overly cool or harsh lights. Keep intensity modest to avoid glare and preserve atmosphere.
Fixture Types & Simple Upgrades
Solar-Powered Stakes
These are plug-and-play options that need no wiring—perfect for DIY quick upgrades. They charge by day and light at night. Their limitation is runtime and brightness, but they’re great for soft illumination and testing layouts.
Low-Voltage LED Path Lights
Wired LED stakes (typically 12V) offer more consistent brightness and longer life. Many kits are built for easy installation along a path, balancing durability and design.
Bollard Lights
Bollards are short pillars that emit light downward around 360°, giving both path illumination and ambient glow to surroundings. They suit modern and minimalist gardens.
Recessed In-Ground Lights
These are embedded flush into the path surface or border. They’re clean, subtle, and great for low-profile lighting in contemporary or minimalist gardens.
Strip / Rope LED Lighting
LED tape or rope lighting tucked under edges or beneath curbs can cast a continuous, gentle glow. It suits modern designs and creates soft, uninterrupted illumination.
Uplights / Moonlighting from Trees
Mounting fixtures high in trees or walls to cast light downward (“moonlighting”) creates soft dappled effects and ambient illumination over paths.
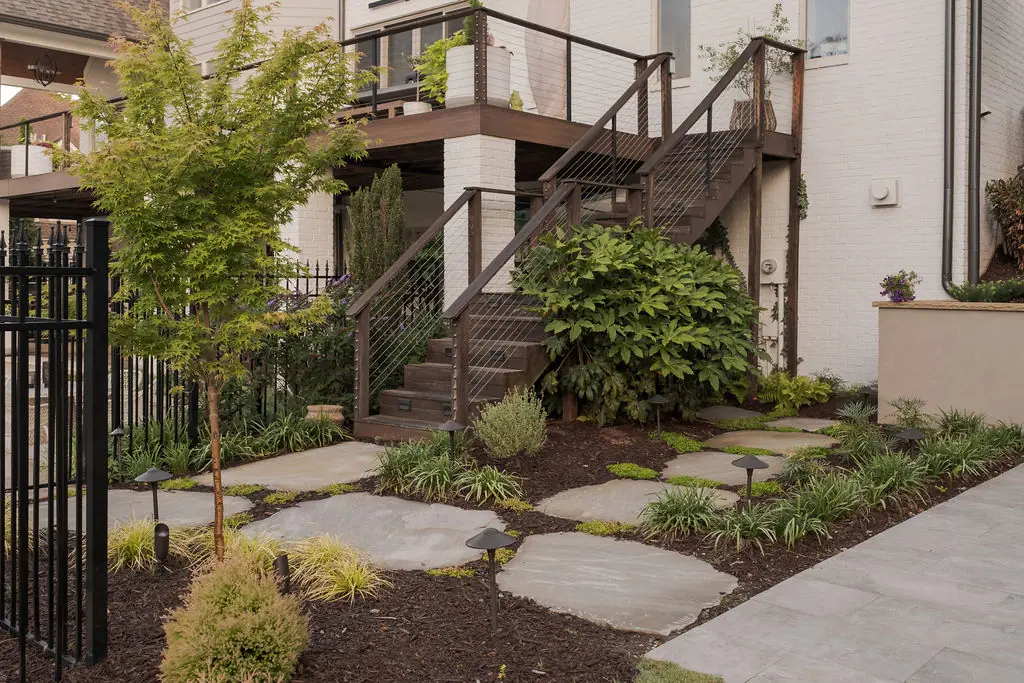
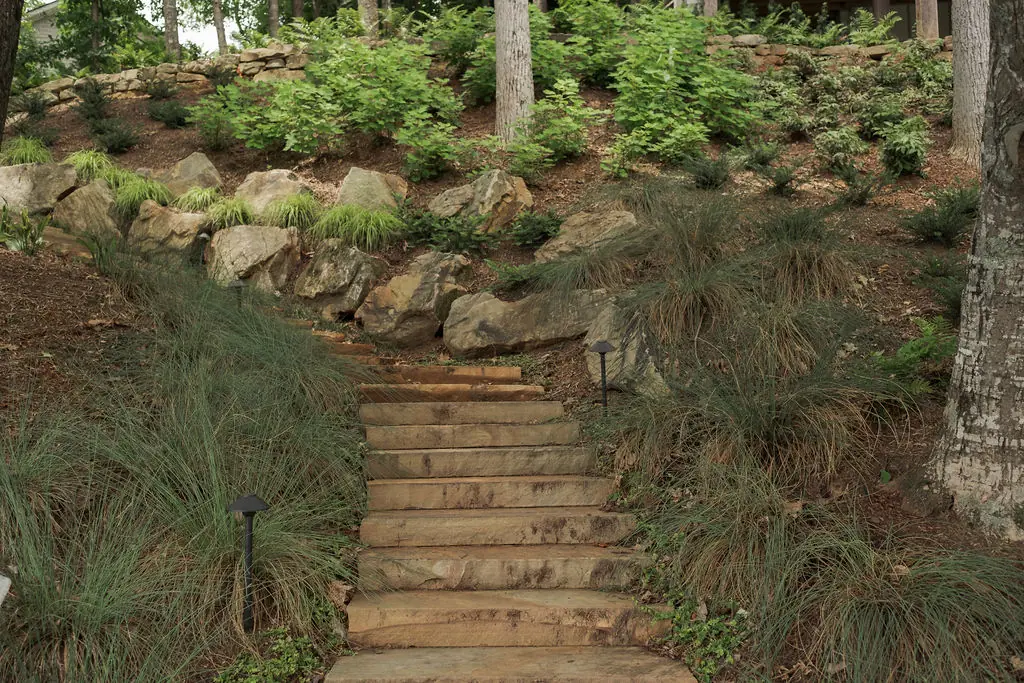
Placement, Spacing & Layout Tips
Optimal Spacing Between Fixtures
Rule of thumb: 8–10 ft (2.5–3 m) separation. Widen spacing if fixtures are more powerful; shorten it where needed near curves or steps.
Staggered vs Symmetrical Placement
Staggering lights (alternating sides) reduces pattern feel and gives more organic lighting. Symmetry works too but can look rigid—choose what matches your landscape style.
Highlighting Curves, Steps & Edges
Place extra lights at bends, steps, or border edges to prevent dark gaps. Use adjustable heads for direction control and to accentuate path curves.
Concealed Placement to Avoid Glare
Hide fixtures behind plants or edges to prevent direct sightlines to bulbs. Use low-profile fixtures or shields to reduce glare and preserve nighttime comfort.
Easy Retrofitting & DIY Upgrades
Solar Kits with No Wiring
For a no-fuss upgrade, solar stake kits are a good first step. Just stake them along your path where they receive sun. They’re ideal for testing layouts or seasonal lighting.
Retrofit LED Heads onto Existing Poles
If you already have poles or fixtures, swapping in LED heads can be a cost-effective upgrade. Many LED modules are drop-in replacements, offering efficiency and longer life.
Using LED Tape Beneath Edges
Attach waterproof LED strip lighting under coping stones, along raised edges, or under garden walls to softly light the ground below.
Motion Sensors & Smart Controls
Add motion-activated lighting or smart timers so path lights only glow when needed, saving energy and reducing light pollution.
Installation Best Practices
Wiring Tips & Grounding
Use proper gauge (low-voltage landscape wire), bury lines under protective conduit, and avoid sharp bends. Always ensure fixtures are grounded and connections are waterproof.
Waterproofing & IP Ratings
Use fixtures rated for outdoor use (e.g., IP67 or higher). Seal all connections with silicone and protective covers to prevent moisture ingress.
Timer and Sensor Integration
Use photocells or timers to automate dusk-to-dawn operation. Combine with motion sensors for bursts of brightness only when needed.
Avoiding Over-illumination
Less is often more. Don’t flood the garden with bright light—maintain shadows and contrast to preserve depth and mood.
Adjustability & Maintenance Access
Use adjustable heads so you can fine-tune beam direction as plants grow. Ensure fixtures are accessible for cleaning or bulb replacement.
Maintenance & Seasonal Considerations
Cleaning Lenses & Replacing Batteries
Dust, pollen, or moss can dim lights over time. Clean lenses periodically. For solar lights, replace batteries every few seasons for optimal brightness.
Vegetation Pruning around Lights
Plants can overgrow and block lighting. Trim foliage to maintain clear light beams, especially for uplights or angled path lights.
Winter / Snow Adaptations
In snowy climates, use recessed lights or higher fixtures so snow doesn’t cover them. Consider fixtures designed to shed snow or built with small heating elements.
Upgrading Over Time
Start simple with solar lights and layer in more permanent wired lighting over time. Replace older fixtures with more efficient or stylish models as budget allows.

Inspiration for Your Pathway Design
- A dark gravel walkway becomes magical when edged with low solar lights, creating a soft glittering corridor.
- Use uplights from nearby trees to cast dappled moonlight over your path.
- A narrow side path lit by recessed lights flush with flagstones gives a clean, modern look.
- Combine rope lighting under steps with bollards along borders to mix textures and enhance depth.
Quick Takeaways
- Even small upgrades like solar stake lights can dramatically improve garden pathway lighting.
- Balance function and ambience—avoid harsh brightness and “runway” effects.
- Use a layered approach: path (task), ambient, and accent lighting.
- Spacing of roughly 8–10 ft between fixtures works best for most paths.
- Retrofit options and smart controls make lighting upgrades simple and energy-efficient.
- Regular maintenance ensures long-lasting beauty and performance.
FAQs
Can I just use solar lights for pathway lighting?
Yes — solar lights are convenient, low-cost, and perfect for DIY setups. However, their brightness and runtime are limited, and performance depends on sunlight exposure. They’re best for smaller paths or supplemental lighting.
How far apart should I place path lights?
A common guideline is 8–10 ft (≈2.5–3 m) between fixtures. Closer spacing may be needed near curves, steps, or with lower output lights.
What color temperature is best for garden pathway lighting?
Opt for warm white (2700–3000 K). It’s soft, welcoming, and complements foliage and natural materials without looking clinical.
Will wired LED path lights cost much to install?
Compared to solar, wired systems have a higher upfront cost (wiring, trenching, installation), but they offer more consistent lighting and longer life. The long-term cost tends to be lower.
How do I avoid glare in my pathway lighting?
Conceal fixtures behind edges or plantings, use downward-facing heads or shielded fixtures, and keep brightness moderate. Adjust fixtures so you don’t directly see the light source.
Conclusion
Garden pathway lighting is one of those upgrades that gives you immediate payoff—for safety, aesthetics, and usability. By applying simple principles of spacing, fixture choice, and layering, you can transform dark walkways into enchanting, welcoming routes through your garden.
Ready to bring your pathways to life? Contact Reedy River Landscapes to design and install a lighting plan that turns your garden into a nighttime retreat you’ll love coming home to.